Showing posts with label white chocolate. Show all posts

Wednesday, 12 August 2009

hazelnut white chocolate cake

hazelnut white chocolate cake wedge

Dear hazelnut white chocolate cake,

You have ruined my life.

There was a time when my family appreciated the baking I did for them. They 'ooh'ed and 'ahh'ed over Daring Baker challenges, and called things 'masterpieces', and stole sneaky squares out of cake tins in the middle of the night. They gave me actual useful feedback (well, some of them did: my little sister's idea of feedback is a scale of comparison to spaghetti carbonara). They suggested ideas for future baking, and so on. They said I didn't have to do the washing up, since I'd cooked. That was my favourite bit.

And then you came along.

hazelnut white chocolate cake

At first all seemed well. 'This is the best cake you've ever made!' my mother declared, cutting herself a second wedge. I thought ruefully of the hours of multiple-stage gateaux that have filled my life thus far, but did not complain. 'You have to make this cake every week from now on', my sister ordered me, with her mouth full.

I laughed. Oh, in my innocence, I laughed.

But I cannot escape you, hazelnut white chocolate cake! Not a day goes by without your squidgy, nutty memory haunting my every step. I write 'rhubarb' and 'flaked almonds' on the shopping list: my family crosses it out and writes 'hazelnuts' and 'white chocolate'! I mention my approaching birthday: they suggest a hazelnut white chocolate birthday cake! I point out that we are celebrating me here, not cake: they point out that they love the cake more than they love me. I retort, sulkily, that it is not THAT good a cake: they beat me with spatulas and locked me in my bedroom.

You see my predicament.

cross section

Oh, I too was charmed by you initially, hazelnut white chocolate cake. I too licked cream cheese frosting from my spatula and concluded, 'that's a pretty good cake'. Your dense, blondie-esque texture certainly appealed to me - but I swear this now, I am no longer taken in! I alone can resist your siren call!

If there is but one way to free myself from your power, my cake-y nemesis, I will seize it. And there is truly only one thing to do:

Bakers, Food-Bloggers, and Hungry Passerbys.

Take this recipe for hazelnut white chocolate cake! Take it to your kitchens, your hard-drive, your culinary-minded friends! Take it far from me, from my treacherous family: bake it, frost it, lick the batter from your KitchenAid paddle (oh, don't even try to pretend it's just me who does that). Our combined force is greater than the sway of this cake! We are stronger than it is!

...And, if it comes to it, we can eat it. Take THAT!

hazelnut white chocolate cake

Hazelnut White Chocolate Cake
Adapted from BBC Good Food magazine

It is true: this cake has thoroughly usurped my place in the family. In all honesty, I was a little taken aback at what a hit it was; while I did find it delicious, my family's reaction was something else. I have to warn you: this has got some very cross reviews on the Good Food website (people with their cakes tasting funny or not cooking properly), but, as always, I can only tell you that it was a big success for me.

The original recipe had 300g of sugar: this sounded a hell of a lot to me, especially with white chocolate in the mix, so I reduced it down to 200g. It certainly didn't need to be any higher (unless you have a chronically sweet tooth), but neither would I go any lower than 200g, I think. I wasn't sure if sugar affects the blondie-like texture of a cake like this; does anyone know if it makes a difference?

250g (1c. + 1tbsp) butter , plus a little extra for greasing
140g
(5oz) white chocolate , broken into pieces
250ml
(1 c.) milk
1 tsp vanilla
250g
(9oz) self-raising flour
¼ tsp bicarbonate of soda
200g
(7oz) caster sugar
2 large eggs, lightly beaten

for the frosting:
300g (10oz) full-fat cream cheese
85g
(2/3 stick) butter , softened
100g
(4oz) icing sugar , sifted
50g
(2oz) hazelnuts, finely chopped

1. Heat oven to 160C. Grease a deep 9" cake tin and line the base with greaseproof paper.

2. Place the butter, white chocolate, milk and vanilla extract in a small saucepan, then heat gently, stirring, until melted. Combine the flour, bicarb and sugar in a large bowl with a pinch of salt, then stir in the melted ingredients and eggs until smooth.

3. Pour the batter into the tin, then bake for 1 hr, or until the cake is golden and a skewer inserted into the centre comes out clean. [Because of the sugar content, the original recipe may get quite a dark crust; let it cook fully. My version is less dark as I reduced the sugar]. Cool in the tin. Once cool, the cake can be wrapped in cling film and foil, then frozen for up to 1 month.

4. To make the frosting, beat together the creamy cheese, butter and icing sugar until smooth. Fold in most of the nuts, spread over the cake, then scatter over the remaining nuts to finish.

hazelnut white chocolate cake

Tuesday, 23 September 2008

I'm In Love

I've told you before how I use food to show affection; in that case, I must love you people very very much. This is The Recipe you've waited all your lives for, The Recipe to end All Recipes; this is what you will want to eat for the rest of your life (probably considerably shortening it in the process; I can't be blamed if you die of vitamin deficiencies or whatever). This is the recipe I make repeatedly at the slightest excuse, and this is the recipe I made on Saturday for a potluck dinner with my friends before we all go our separate ways to university.


But you know, if you wanted to make it, you wouldn't need a momentous occasion like that. After the first time, you get good at making up occasions. You start inviting people round specially and pretending it's a big deal when really you see them every other day/they deliver your post. In my family, we started off making this recipe because it was Christmas, and finished up making it because it was Tuesday.

I've wanted to blog about this cheesecake more or less since Happy Love Strawberry was created (actually, it might have been the reason it was created; I forget) but as it's usually made for a big occasion there's never a chance for decent photos, and I really wanted to do this justice. And then, of course, I got my beautiful Nikon D40, and -- actually, it might have been the reason I got the Nikon D40, too. Hm.

Ohh, look at that texture. That's worth buying £300 worth of camera for.

I can only go on about this cheesecake before so long before you all want to beat my face in with a shovel (er, a surprisingly violent imagination just emerged there) so I will say only this: make this. Make this now. Make this if you want everyone who tastes it to fall in love with you. Make it to celebrate your birthday/Christmas/Easter/wedding/funeral/diabetes diagnosis -- okay, perhaps not that one.

The first person who comments and says 'I made this and I didn't like it...' gets their face beaten in with a shovel. I simply won't believe you.


White Chocolate & Raspberry Cheesecake
Recipe adapted from The People's Cookbook, as seen in Good Food magazine (July 07).
Serves 12

For the base:
85g (3oz) digestive biscuits, crushed (Americans; graham crackers. I usually use 100g of each for the base cause I like a little bit more)
85g (30z) ginger nut biscuits, crushed
85g (3oz) butter, melted

For the filling:
500g (1lb 2oz) white chocolate, broken into pieces
50g (2oz) butter
1/2 vanilla pod, split lengthways
500g (1lb 2oz) full fat soft cheese
50g caster sugar
175ml whipping cream
225g punnet fresh raspberries, plus extra to decorate

1. For the base, combine biscuits & butter, then press into the base of a 23cm (9.5") springform tin.

2. For the filling, put the chocolate, butter and vanilla pod in a heatproof bowl and microwave in 20-second bursts to melt it. Allow to cool slightly.

3. In another bowl, mix the soft cheese, sugar and whipping cream til smooth.

4. Remove the vanilla pod from the chocolate mixture and stir the chocolate into the cream. Gently stir in raspberries with a spatula, then spoon on top of the base, smooth carefully, and leave in the fridge to set (8-24 hours).

5. Remove from tin and decorate with raspberries to serve.

I go to uni on Saturday, so blog posts may be sporadic for a while - I'm hoping to get in this month's Daring Baker challenge but time might be against me this week. Bear with me a bit and I'll be back with part two of the sugarcraft flower tutorial soon ^__^.

Also, I made a Flickr account! I'm not sure why. But it makes me feel cool.


Yeah, I ate this. Win.

Wednesday, 28 May 2008

DB 3: The Phantom Of The Opera

It's Daring Baker time!! And after this month's challenge, I've come to the conclusion that the DBers are not the ninja pirates I suspected they were.

They are, in fact, MAGICIANS.


To explain: I messed this up in more or less every possible way. The thing was, I'd decided to halve it, cause the original recipe made such an epic sized cake. So as I went along, I used half quantities of sugar, flour, butter... and then my brain malfuctioned (#1) and in went ALL the almonds (I seem to have an unconscious desire to waste ground almonds), all of whatever else, full quantities of buttercream for a half sized cake... you name it, I messed up the amounts of it.

The cake came out of the oven looking suspiciously All Right. I eyed it pensively, decided this must be Daring Baker magic, and continued on my merry way.


Brain malfunction #2: Deciding it would be a good idea to colour the syrup (oh yeah; full quantities of that) pink rather than the actual cake. Meant my cake was kind of marbled in places where the syrup had been poured over the sponge. Does that sound pretty? It was actually kind of crap.

I just like to shatter your illusions there. Sorry.

Then there was #3: Mixing the buttercream, putting it in a tub to be assembled the next day, and then remembering I'd wanted that to be pink as well, scraping it out, colouring it, and piling it all back in again.


#4: Deciding reading the recipe was once again not for me when it came to the mousse, and instead of melting the white chocolate with a couple of tbsp of the cream, chucking it all in. My mousse was not so much mousse as sauce. It tasted fantastic. But it was sauce. I left it in the freezer, hoping it would solidify a bit (I'm an optimist) but let me just say that recipes? Are written down for a reason. Oh Daring Bakers, you teach me so much.

#5: Actually I don't know if this was the fault of my brain or of my culinary skillz (which is worse?) but I had serious issues with the white chocolate glaze; everything started melting and dying and seizing up left right and centre. I made full quantities of that (on purpose this time!) and had to glaze the entire cake rather than just the top to try and hide the sorry state of affairs.


And this is where the Daring Bakers show their true colours as practioners of the magical arts: this cake was gorgeous. Despite the mad quantities, and the failure of my mousse, and my lack of recipe-reading, and the travesty I made of the glaze, this really was delicious, and a massive hit with my mum especially, who requested it as her birthday cake (me: 'O NOEZ!! NOT AGAIN!! DDD='). Looks like the Daring Bakers were watching over me XD.

I might go and sacrifice a lamb or something to them now. Or at least a batch of cookies.

Daring Bakers' Opéra Cake
(white chocolate & rosewater)
Recipe is here. I used half quantities. Mostly.

Anyone got any ideas what else I can make with rosewater essence? I loved it in this, and am dying to use it in other things. Expect rose flavoured everything for a few weeks, until the novelty wears off XD.

Sunday, 25 May 2008

Taken With A Pinch Of Salt

I have a lot of excuses to make, and most of them are along the lines of 'procrastination' and 'revision' and 'new job', so rather than dwell on the reasons I've pretty much failed as a food blogger recently, I'm going to ply you all with cookies to make you love me again. You do love me, right?
Shall I tell you what I love? Food, Glorious Food, and specifically, Antonia, for giving me this lovely award that it's taken me such a bad-mannered length of time to post about. Thank you so much Antonia!! I have no idea what Arte Y Pico means, but I do speak the language of... food? so when I pass the award on to five other deserving food bloggers - further down in this post - for their creativity, design, interesting material, and contribution to the blogging community (I copied and pasted that. You could tell, yeah?) you will know that what I really mean is 'YAY LOVE YOU, YUM YUM HEEEE'. And so on.

You know what else I YAY LOVE YUM YUM HEEEE? These cookies. You may have seen them before; they're the salted white chocolate oatmeal cookies from Smitten Kitchen. I imagine Smitten Kitchen as an actual big farmhouse kitchen with sheepdogs and a range and lots of these cookies; also, I want to live there. As a permanent resident. I ate one of these cookies fresh from the oven, and they were just the right mix of salty-sweetness and crispy-softness and other such culinary contradictions.

I don't know where sentences like that come from, I really don't. Sorry.

Without further ado: I'm making an effort not to pass this award onto people I've tagged before (sorry, because a lot of you really do deserve it. Also I hope I can remember who I've tagged and not tagged before, but can't be sure X__X), so with that in mind, I'd like to give the Arte Y Pico award to the following five bloggers:

Nilmandra at Soy & Pepper
Salted Oatmeal White Chocolate Cookies
American measurements here at Smitten Kitchen
Makes 24

140g plain flour
3/4 tsp baking powder
1/2 tsp baking soda
1/4 tsp salt
200g unsalted butter, slightly softened
180g sugar
30g light brown sugar
1 large egg
1 tsp vanilla extract
250g old-fashioned rolled oats
170g good-quality white chocolate bar, chopped
1/2 teapoon flaky sea salt (for sprinkling on top)

1. Preheat oven to 350 degrees. Line baking sheet with parchment paper or Silpat. Whisk flour, baking powder, baking soda, and table salt in a medium bowl.

2. Beat butter and sugars until light and fluffy. Scrape down bowl with rubber spatula, then add egg and vanilla and beat until incorporated. Scrape down bowl again. Add flour mixture gradually and mix until just incorporated and smooth. Gradually add oats and white chocolate and mix until well incorporated.

3. Divide dough into 24 equal portions, each about 2 tablespoons. Roll between palms into balls, then place on lined baking sheets about 2 1/2 inches apart. Using fingertips, gently press down each ball to about ¾-inch thickness.

4. Sprinkle a flake or two of sea salt on each cookie

5. Bake until cookies are deep golden brown, about 13 to 16 minutes, rotating baking sheet halfway through. Transfer baking sheet to wire rack to cool.


PS: And in case you were thinking I couldn't fail any more... huge thank you to Diva at The Sugar Bar for the 'You Make My Day' award, which I completely forgot to mention and now feel like a fool about. It made me smile so much! Rather than pass this one on, since I'm in a hurry and trying not to draw attention to how I forgot to tag others earlier, I'd like to ask everyone to take a look at some of the blogs on my -newly updated- blogroll (right); all of them are fantastic, and I visit them so often. They all really deserve this, because reading everyone's blogs cheers me right up XD.

As do cookies, but in a different way.

Monday, 19 May 2008

The Right Road

Yep. It's one of my infamous health foods again.

I have really good excuses justification for this one, though! This one has actual fruit in! In a dried, sweetened sort of way. Hear me out.

So, the original recipe looked more like this. Yes, these were originally Rocky Road Bars - I'm not exactly sure what they are now. A road somewhere else, presumeably. I cut out the cocoa powder (upping the flour to make up), added white chocolate instead coughcough, changed and reduced the sugar, added dessicated coconut (which I'm certain is healthy, but can't back up with any factual knowledge or anything. Now I've left school, everyone knows I don't have knowledge anymore), and swapped all the sugar-high toppings for... sugar-high fruit toppings.

So, those are my excuses for eating these. My excuses for making them?

...I don't actually have any. Yeah, it's true; I've run out of excuses to bake. My friends are all busy revising and working and so on, and I mostly sit at home procrastinating, singing the soundtrack to Wicked: The Musical and occasionally recreating a Native American sun dance (something I came across in my US History notes. Wait til I get to Russian History; who knows what that has in store?). When your days are filled with this sort of thing, it's hard to find someone who wants to hang out with you. Can I get an 'aww'?

Anyone? Fine then.

I've been reduced to actually baking for my family, who (sorry) usually don't deserve it. Firstly there was the Daring Baker challe-- only kidding, DBers! Put your hitmen back in their drawer! I'm not going to give that away yet. But needless to say my family are pretty shocked. It's maybe because of this that these bars have been such a hit - they keep eating more to check they're really there.

Me? Er, same.

Tropical Road Bars
Makes 16

115g butter
100g caster sugar
1 large egg
70g plain flour
1/4 tsp salt
120ml milk
1 tsp vanilla extract
2 tbsp dessicated coconut
100g white chocolate, melted

For topping:
40g dessicated coconut
80g milk chocolate chips (Okay, I didn't have a full bag for some reason)
200g dried apricots
100g dried sweetened pineapple

Preheat oven to 180C. Line an 8-inch square pan.

1. In a medium saucepan, melt butter and white chocolate, then remove from heat and stir in sugar, egg, flour, salt, milk, coconut and vanilla extract until well-blended.Pour mixture into prepared pan and bake for 20 minutes.

2. Remove pan from oven and top with coconut, chocolate chips, apricots and pineapple, pressing them down with a spatula. Return to oven and bake for 5-7 additional minutes (I upped the temperature a bit, to toast the coconut on the top). Cool on a wire rack before slicing with a damp or lightly greased knife into 16 bars. Bars can be stored at room temperature or in the fridge.

3. My toppings kept falling everywhere as I hadn't pressed them down hard enough, so just in case I hadn't hit my sugar quota for the day I made a thin caramel syrup (10g butter, 4 tbsp sugar, a slosh of milk) to pour over the top of the bars while they were still in the pan, to hopefully glue the toppings on. This probably isn't necessary, but I just really like sugar.


Ah, sugar. My true friend. You would never forsake me for Classics revision.

Sunday, 27 April 2008

DB 2: A Revolution On A Stick

This is it. The Revolution has come.

They said it couldn't be done. 'Food on a stick?!' they cried. 'Don't be ridiculous. How could you eat, say, cake on a stick? Fish on a stick? Cheesecake on a stick?'

No one actually did say that, to my knowledge, but I'm sure they would have done had I proposed food on sticks.

To which I would reply airily, 'cheesecake pop?'


Yes, it's that time of the month. No, not that time of the month. Daring Baker time of the month. And because I like to start revolutions (albeit of the slightly limited, let's-eat-things-off-sticks kind, rather than the Call-in-the-Communists kind) I was ridiculously excited over it. Not least because I got to turn chocolate pink.

That wasn't in the recipe, or anything. I just saw the DB recipe and thought, 'this calls for pink chocolate'.


Now for business:

  • This called for a ridiculous amount of cream cheese, so I, er, two-fifth-ed the recipe. It seemed to work. I'll give the quantities I used below.
  • Lolly sticks were nowhere to be found round where I live, not even for ready money (customary Wilde quote slipped in there, sorry). I used cocktail sticks on a suggestion from one of my friends - this is the reason she got into Oxford, I think - and used a melon baller to size my pops. At least, I think it was a melon baller. I don't eat melon, so it could have been anything, on reflection.
  • 35-45 minutes for a water bath cheesecake? BOLLOCKS. I upped it to almost an hour, and my cheesecake was half sized, and even so it was underdone!
  • This meant I pretty much had to keep my pops in the freezer. In fact, there's no pretty much about it. I did. And I had to dip them in chocolate in batches, cause if they were out of the freezer too long they collapsed and dropped in the melted chocolate and I was forced to eat them. It was terrible. No, really.
  • No, not really. But I did eat them. Yum yum yum.

Cheesecake Pops
These are the reduced quantities I used. For the real quantities, look on the DB blogroll and you should find them on more or less any blog there. For the actual directions, below, my adaptations or metric-isations are in red.

448g soft cheese
320g caster sugar
15g plain flour
pinch salt
2 eggs
1 yolk
1 tsp vanilla
25ml double cream
180g chocolate (
in theory, but I used a huge amount, haha. About 300gish? Say 100g of each kind of chocolate, if you're doing it my way)
1 dessertspoon vegetable oil (rather than buy shortening)

Boiling water as needed
Thirty to forty 8-inch lollipop sticks/ cocktail sticks.
Assorted decorations such as chopped nuts, colored jimmies, crushed peppermints, mini chocolate chips, sanding sugars, dragees) - Optional

Position oven rack in the middle of the oven and preheat to 180C. Set some water to boil.

1. In a large bowl, beat together the cream cheese, sugar, flour, and salt until smooth. If using a mixer, mix on low speed. Add the whole eggs and the egg yolks, one at a time, beating well (but still at low speed) after each addition. Beat in the vanilla and cream.

2. Grease an 8-inch cake pan (not a springform pan), and pour the batter into the cake pan. (I then wrapped this in foil to stop the water bath making it soggy; a little bit got in anyway but I'd definitely recommend using foil around the cake tin). Place the pan in a larger roasting pan. Fill the roasting pan with the boiling water until it reaches halfway up the sides of the cake pan. Bake until the cheesecake is firm and slightly golden on top, 45mins to an hour. It needs to be fully cooked!

3. Remove the cheesecake from the water bath and cool to room temperature. Cover the cheesecake with plastic wrap and refrigerate until very cold, at least 3 hours or up to overnight.
When the cheesecake is cold and very firm, scoop the cheesecake into 2-ounce balls and place on a parchment paper-lined baking sheet. Carefully insert a lollipop stick into each cheesecake ball. Freeze the cheesecake pops, uncovered, until very hard, at least 1 – 2 hours. I used a melon baller, which worked. But my cheesecake was so soft I had to keep the pops in the freezer full time.

4. When the cheesecake pops are frozen and ready for dipping, prepare the chocolate. Microwave half the chocolate and half the shortening on high at 30 second intervals, until chocolate is melted and chocolate and shortening are combined. Stir until completely smooth. Do not heat the chocolate too much or your chocolate will lose it’s shine after it has dried. Save the rest of the chocolate and shortening for later dipping, or use another type of chocolate for variety.

5. Quickly dip a frozen cheesecake pop in the melted chocolate, swirling quickly to coat it completely. Shake off any excess into the melted chocolate. If you like, you can now roll the pops quickly in optional decorations. You can also drizzle them with a contrasting color of melted chocolate. Place the pop on a clean parchment paper-lined baking sheet to set. Repeat with remaining pops, melting more chocolate and shortening (or confectionary chocolate pieces) as needed.

Refrigerate the pops for up to 24 hours, until ready to serve.

These did take a long time, mostly I think because I got so excited over decorating them (crushed biscuits to make it more cheesecakey, sprinkles, chocolate chips...) but they were such a hit with my family it was worth it. The crack of the chocolate and the soft cheesecake when you bit into them = total win.

Sunday, 20 April 2008

Happy Birthday, Your Majesty!

Picture the scene. The Queen walks into her drawing room early tomorrow morning (does she have a drawing room? Don't spoil the magic with particulars) and sits down, picking up her china teapot to pour herself a nice cup of earl grey. She pulls her favourite teacup towards her (she definitely has a favourite teacup. The Queen and I, we're like this), glances down - and instead of a cup of tea, she sees .... a muffin of tea?


Don't panic, Ma'am! This isn't any old commoner muffin - this is an earl grey and white chocolate muffin, especially for your birthday!


In fact, the Queen should probably panic anyway, because for me to do this I'd have to break into Buckingham Palace some time tonight, probably hotly pursued by the Royal guards, all shooting to kill - but for the Queen's (unofficial) birthday, I think it's worth it. And I think she'd appreciate it (like this, remember?), if her love for tea/cake/royalty is anything approaching mine.


So rather than a birthday cake, a muffin that could just fit in a teacup seemed perfectly fitting.


I'm taking this into school tomorrow, as my friends love the Queen almost as much as I do (almost. I think I'm a very infectious sort of person?), so we'll probably eat them with our cups of (liquid) tea in our free periods tomorrow, while cheerfully discussing how great the Queen is. Man, she is so great. I wish I was the Queen. All it needs is a birthday candle stuck in the middle of one, and things would be perfect.

Actually, I might do the candle thing. Worst case scenario is that the fire alarms go off and I miss History. Sorry, did I say worst?

I found the recipe for these on Eat Me, Delicious - my muffins look pretty different, but I think that's cause I didn't really have enough Earl Grey - I only drink proper, manly tea, so I had to flutter my eyelashes at my previously mentioned friend Alex a bit to scrounge an Earl Grey teabag off her. It seemed a bit cheeky to ask for two - not that that usually stops me - particularly as I spend a large proportion of my time mocking her for drinking flowery, girly tea. You see; the Queen's influence has me being all polite, and civilised! The woman deserves more than a muffin.

Earl Grey White Chocolate Chunk Muffins
American measurements here on Eat Me, Delicious.
Metric conversion by me.
Adapted from Baking From My Home To Yours

Makes 12 (so enough for all the corgis)

120g sugar
280g plain flour
2 tsp baking powder
1/4 tsp bicarbonate of soda
1/4 tsp salt
1 tbsp ground Earl Grey tea (or more)
360ml sour cream
2 large eggs
1 tsp pure vanilla extract
115g unsalted butter, melted and cooled
100g white chocolate chunks
(I used 150g, because you can't have too much chocolate when it comes to royalty)

1. Center a rack in the oven and preheat the oven to 190C. Butter or spray the 12 molds in a regular-size muffin pan or fit the molds with paper muffin cups.

2. In a large bowl, whisk together the sugar, flour, baking powder, baking soda, salt, and ground Earl Grey tea. In a large glass measuring cup or another bowl, whisk the sour cream, eggs, vanilla, and melted butter together until well blended. Pour the liquid ingredients over the dry ingredients and, with the whisk or a rubber spatula, gently but quickly stir to blend. Don't worry about being thorough - a few lumps are better than over mixing the batter. Stir in the white chocolate chunks. Divide the batter evenly among the muffins cups.

3. Bake for 18 to 20 minutes, or until the tops are golden and a thin knife inserted into the center of the muffins comes out clean. Transfer the pan to a rack and cool for 5 minutes before carefully removing each muffin from its mold.

Happy Unofficial Birthday to the Queen for tomorrow!

Tuesday, 15 April 2008

Worth Waiting Four Years For


It's needless to say, but I don't remember everything I make. I remember Psychology revision pretty well, and I can recall conversations or emails word for word; but I can't remember important documents, where I leave things, or traumatic events. (That last one is, I think, repression; the Psychology revision comes in somewhere).

Anyway, the other day I was reminiscing with my friend Alex about the good old days of Home Ec. GCSE (well it FEELS like a long time ago), and she said, 'do you remember when we both got into the finals of that cooking competition thing?'

'Er,' I said, 'no.'

I have very cold and stiff fingers cause I've just been walking the dog so I'm tempted to say that the conversation ended there, but actually she perservered a bit: 'The 'Taste of Success' thing. We had to go into the university and you made something with chicken and shallots, and this white chocolate pudding thing which I really wanted the recipe for.'

It was beginning to sound familiar. 'I don't remember the food... did I give it you or what?'

'No.' Oops. 'You forgot. But it was in little ramekins, and there were all berries at the bottom - raspberries and stuff - and white chocolate cream and then it was like a creme brulee top that you did on the grill.'

I stared at her. 'Alex,' I said, 'I made that recipe, once, four years ago. That's almost a quarter of your life. (No, I'm not so hot at maths). Are you sure I didn't give you the recipe? Because you seem to have memorised it.'

She looked melancholy. 'I just really wanted that recipe,' she sniffed.


I think the reason I'd blanked this entire episode from my mind was that a cooking competition = pressure, and I don't perform well under pressure (I once announced in a French oral exam that my dream was to be a 'chaussure'. Chaussure means SHOE. I was trying for 'chanteuse'; singer). Alex, apparently, had not, so when I went home I started going through my mum's books to try and find the recipe I'd promised her four years ago.

This is it.

White Chocolate Berry Gratin
Adapted from one of my mum's recipes (so probably originally from Good Food).
Ready in 15 mins plus cooling.
Serves 4; 356 cals p/s

140g strawberries, hulled and quartered
140g raspberries
140g blueberries (I missed these out as my sister won't eat them, so used more of the other two)
grated zest of one small lemon
100g white choc
142ml pot double cream
2 tbsp icing sugar

1. Scatter the berries into medium ramekins. Sprinkle with the lemon zest, cover & leave to chill in the fridge until ready to serve.

2. Meanwhile break up the chocolate into a small bowl. Heat the cream in a pan until almost boiling, then pour over the chocolate. Leave for three mins then stir slowly til dissolved (Alex objected to my use of the word 'dissolve' here - she is a sciencey type - until I offered to stick the recipe up her nose, at which she relented). Allow to cool to room temp until thickened.

3. To serve, use a small kitchen blowtorch or heat the grill for a few mins until hot. Spoon the chocolate cream over the berries, sprinkle over the icing sugar and blast/grill for a couple of minutes until it starts to brown & caramelise. Remove & serve immediately.


(I copied the recipe out a couple of weeks ago and stuck it in her birthday card. How could I not, after a freakishly amazing feat of memory like that?)


Saturday, 19 January 2008

Blondies - 1. Indy - 0


I don't have a good track record with brownies, that's important to know. If they cook round the edges they don't cook in the middle, and I end up leaving them in the oven an hour longer than they say. Or else I leave them in the fridge, hoping they'll set, and end up with a pan full of goo. I've stuck them in the freezer overnight before now, and still ended up with a pan full of goo. I've tried recipe after recipe, I've changed recipe after recipe, I've blamed every cooking utensil I own, I've shut my own head in the oven in despair... but no kebab. Or even brownie.


The last time this happened, I was reduced to eating the semi-cooked brownie chocolate mixture straight out of the pan to make myself feel better.


Yes, I did eat an entire tray of brownie goo.
Yes, I was then copiously sick in the toilet and had to lie in a dark room for the rest of the afternoon.
Don't follow my example.


The point is, when I came across this recipe on Feed Me! I'm Hungry, the thought struck me that blondies could succeed where brownies failed.

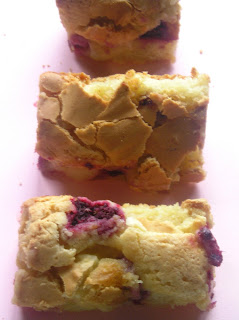
Look at the blondie on that post. Then look at my blondie.
It turns out I have no more talent with white chocolate than I do with regular chocolate X__X.


I'm recommending the recipe anyway, because the ones on Feed Me! I'm Hungry look SO GOOD, and my 'blondies' did at least taste fantastic. The problem was, as always, the outside overcooking, and the inside NOT COOKING AT ALL. EVER. PERIOD. I might try it again though, perhaps splitting the mixture between two smaller pans in the hope it'll cook more evenly, or maybe covering it with foil at about the forty minute mark to prevent the outsides burning.

Anyone got any ideas why my brownies/ blondies ALWAYS ALWAYS fail? I've hit a wall. It's a gorgeous, chocolatey, fruity, nutty, gooey wall, but all the same. I've been outwitted by a tray of chocolate gunk.

This does nothing for my self-esteem. I'm consoling myself with the fact that if this all becomes too much, at least I can eat my challenger. Bite me.