Monday 27 October 2008

Capital Letter Cheesecake Bars


Sometimes I suspect that I'm subliminally trying to sabotage my own baking efforts so I'll be forced to make something again. Take these for example. Yes, every square is a little mouthful of Purest Heaven... but I screwed up, of all things, the chocolate drizzle over the top. How can anyone screw up a chocolate drizzle? All you have to do is, uh, drizzle chocolate. But no; mine seized up in the microwave until I had to add so much milk and butter to sort it out that it turned into a sauce/glaze. And it bothers me. It really does. I keep looking at the pictures and imagining them with drizzle; it's the tragedy of my heart.

And I just know I won't be satisfied until I make them again. With chocolate drizzle. And then I'll have to eat them, and you know, my life is so traumatic?


There are possibly a couple of things that could persuade me to forgive these bars. Firstly: they're called 'chocolate chip cookie dough cheesecake bars', and if you think that's a mouthful, wait til you take a real one.

Secondly: OH MY DAYS THEY'RE THE BEST THINGS EVER.


I mean, hello, CHEESECAKE (I think we all know how I feel about cheesecake, and to avoid scaring off anyone who doesn't know, I won't go into further detail). COOKIE DOUGH. I think everyone feels the same way about cookie dough. CHOCOLATE CHIPS. Self explanatory. CAPITAL LETTERS.

--Okay, fine, I just like to over-emphasize. Otherwise you might've missed all the chocolate chip/cookie dough/cheesecake components in these chocolate chip cookie dough cheesecake bars, or something.

To summarise: you absolutely can't go wrong with something like this.


Apart from the chocolate drizzle. Apparently it's easier to go wrong with a chocolate drizzle than you'd expect.

Chocolate Chip Cookie Dough Cheesecake Bars
Adapted from the version found on Bake Or Break
The Essential Chocolate Chip Cookbook.

Crust:
200gish (1 & 1/2 c.) choc chip cookie crumbs (I used choc chip Maryland cookies cause my flatmate was, get this, THROWING THEM OUT. They'd apparently 'gone soft'. I DO NOT BELIEVE IN SUCH BLASPHEMY. The original recipe uses plain graham crackers/digestives but also includes about 70g mini chocolate chips, which I omitted)
75g unsalted butter, melted

Sorry measurements are vague, by the way; I did half quantities and improvised a lot. If you have American measuring cups, you might want to dig them out for this one.

Preheat oven to 325°.

1. Butter a 9"-square baking pan. Line pan with parchment paper, leaving enough to extend over the sides. Butter the parchment paper.

2. Combine cookie crumbs and butter until crumbs are moistened. Stir in chocolate chips if using. Press crust mixture into bottom of pan and 1 inch up sides. Bake for 6 minutes. Set pan on wire rack to cool

Cookie Dough:
75g unsalted butter, at room temperature
40g light brown sugar
3 tbsp caster sugar
1/8 teaspoon salt
1 tsp vanilla extract
100g plain flour
100g (1 c.) semisweet chocolate chips

3. Using an electric mixer , mix butter, brown sugar, sugar, salt, and vanilla extract at medium speed until smooth. Decrease mixer speed to low and add flour. Mix just until incorporated. Stir in chocolate chips. Set aside.

Fun fact: I stirred this all by hand and broke my wooden spoon in half.

Not deliberately.

Filling:
280g cream cheese, at room temperature
45g (1/4 c.) caster sugar
1 large egg, at room temperature
1 teaspoon vanilla extract

4. Using an electric mixer, beat cream cheese and sugar just until smooth. Add egg and vanilla extract, beating just until blended. Pour batter into baked crust. Drop cookie dough by teaspoonfuls over the top of the filling.

Bake about 30 minutes, or until set. Transfer to wire rack.

For chocolate topping, melt 1/3 cup semisweet chocolate chips in a double boiler or in the microwave. Add about 1/2 tablespoon of butter if necessary to make chocolate smooth. Drizzle over top of bars. Cool bars in pan completely, about an hour.

Using the edges of the parchment paper, remove bars from pan. Cut into bars and serve.

Wednesday 22 October 2008

Autumn Days


You know the idea of Autumn? Sitting inside in front of a glowing fire, all snug and warm when it's dark and cold outside; drifts of crisp red and gold leaves which you crunch underfoot and kick into the air; the air getting that little bit sharper and fresher, turning your cheeks pink and making you curl your sleeves around your hands to keep them warm. Pub lunches, with dark wood and bright candles... I love it.

What I hate is Actual Autumn; wearing about twelve layers to pad restlessly about the house in and still being cold, and being bored to death because there's nothing to do inside and you can't go out without getting soaked. Wet feet. Thoroughly depressing grey days.


You wouldn't think a season could change that much from one end of a country to the other (uh, unless you live in, I don't know, Russia. I'm talking an England-sized country, here), but Autumn has been a revelation to me these past few weeks. It turns out watching everything die is a lot more picturesque under bright, clear sunlight; on campus there's a bush such a bright shade of red that it looks like it's burning, and on Saturday my flatmates and I went walking on the common and found a baby Christmas tree growing in a secluded corner.

This is the sort of seasonal comfort food that my brain automatically associates with Autumn-in-inverted-commas, and it's been such a shock to actually have an Autumn (rather than the Northern alternative: 'Death Months') that I thought it was time to dig out the recipe. I made it for the first last year - just before Halloween, actually; I remember because I was hurrying to get tea ready for my dad and sister before I went out to a party. If it amuses you, imagine me cooking this dressed as Anne Boleyn. It adds a certain je ne sais quoi, I think.

Anyway, it's totally comforting, ridiculously easy (if you have a food processor. You know, the sort I Don't Have At Uni with me. I used a masher and tore up the breadcrumbs by hand) and extremely cheap, which gives me a good feeling about my ability to look after myself in the big wide world. Oh, and healthy, don't forget that. Don't let those Death Months strike you down, as we say up North.

...We don't actually say that. I might just tell people that we do.

Carrot & Parsnip Crumble
Recipe from Josceline Dimbleby's Complete Cookbook
Serves 4.

100g brown bread (leave crusts on)
675g carrots
450g parsnips
4 tbsp fromage frais or similar
(this time I used yoghurt; I've used creme fraiche before)
1/4-1/2 tsp nutmeg
75g grated cheddar cheese
25g parmesan
(I skipped this and use 100g cheddar)
2 tsp dried oregano
3 tbsp olive oil
salt & pepper

1. Whizz (or tear) the bread to crumbs in a food processor, then set aside in a bowl. Peel and chop carrots and parsnips roughly, then boil them til very soft. Drain and put in the food processor (may need two batches) with the fromage frais, and whizz to a smooth paste.

2. Grate in the nutmeg & add salt and pepper to taste. Turn the mixture into a shallow ovenproof dish and spread level.

3.Stir grated cheese, oregano and olive oil into the breadcrumbs and spread that evenly over the top of the pureed veg. Cook for 15-25 mins at 230C, til the topping is crisp and golden.


Friday 17 October 2008

It's Always Tea-Time!

'I know this one! Slaying entails certain sacrifices, blah, blah,biddie blah, I'm so stuffy, give me a scone.' -- Buffy the Vampire Slayer

Back in the day (ie, April), I wrote about my friends and my ill-fated plans for a period style teaparty outdoors, but it was only last month that the weather actually stayed nice long enough for us to pull it off (it was a dismal summer, okay? Eventually we got desperate and said we'd do it outdoors unless it bucketed it down with rain, when we'd go to someone's house; on the morning, my friend Boy texted in bewilderment, 'bright but moist?! What do we do?', haha. The trials and tribulations we endured...)

The short notice meant that the British-themed blog post I'd had in the back of my mind never really came off, and I was baking scones and shortbread the night before with no time for a morning photo shoot (they're divas, those baked goods; the light has to be just so).


I had a load of yoghurt left over from... something or other... taking up precious fridge room (with one fridge between seven hungry students, you understand why I couldn't just leave it to ferment), so when I came across a scone recipe which used yoghurt rather than egg (I have a moral dilemna over eggs at the moment; free-range cost nearly £1 more, and I can't bring myself to spend it, but at the same time I can't bring myself to knowingly buy battery eggs. I'm solving this currently by just not using eggs, but I sort of recognise that this isn't much of a long-term solution) and which involved very little butter and only a tablespoon of sugar!- I don't take much convincing for these sorts of things.


And, of course, it meant that I finally got to post a scone recipe up on Happy Love Strawberry. It may not be my gran's recipe, and it may not be the one I made for our tea-party, and it may even be the first time I've made scones without a cutter, by shaping it into a square and cutting it into nine -- I don't know why I'm saying 'may' anymore. I don't have a circle cutter, it's the tragedy of my life -- but the point is, we British never say no to a scone, whatever the situation XD.

(Incidentally! I've found another Queen fan -no, new readers, I don't mean the Freddie Mercury type Queen, I mean, The Queen - here at uni; we have matching union flag cushions! It's meant to be).


Yoghurt Scones
Recipe found here
Makes 9 small scones

50g butter, chopped into cubes and softened
280g (2 c.) plain flour
1 tsp baking soda
1 Tbs baking powder
1 Tbs sugar
120ml (1/2 c.) thick yoghurt
(I used lowfat) and 60-120ml (1/4c - 1/2 c.) water (start with 1/4c), mixed together

Preheat Oven to 220C or 440F

1. Sift dry ingredients onto softened butter, and mush together with your fingers until the mixture looks like fine breadcrumbs. Pour in the sugar, yoghurt mix, and quickly mix to form a soft dough. Add more water if the mixture appears dry and the dough feels tough.

2. Dust an oven tray with flour, and roll the dough out into a 20cm square. Cut into thirds horizontally and vertically so you end up with 9 scones, but DON'T separate. (I did, because I'm an idiot, but then I realised and pushed them back together again. My cunning knows no bounds).

3. Bake for about 10 minutes in center rack of your oven until tops are pale golden, then divide them up. Serve hot/warm - once cool, these taste better microwaved for 10 seconds.


These have a great texture, but like all scones, aren't very sweet, so they do need jam. Whipped or clotted cream would be perfect too, but I had cream cheese in the fridge so I ate some with that.

When I say 'ate some', I mean, 'had three for lunch', obviously. Ah, the student lifestyle. Who needs nutrition?


Saturday 11 October 2008

Cake Or Shoes?

As a shiny new university student (I'll have been here two weeks tomorrow; can't believe it) my cooking and baking compulsion habits have had to change a bit. This is largely due to the fact that I'm now shopping for myself, and having to use my own - perfectly good Topshop money - to buy food and ingredients.

I have trouble prioritising between Topshop and eating, so I don't exactly have money to spare on baking stuff. And now that I'm feeding myself, I find myself browsing Tastespotting and Food Blog Search for savoury, rather than sweet, ideas now... definitely a new experience for me.

I'm getting old, aren't I? Don't tell me. I'm old.

Excuse me while I weep, a moment.

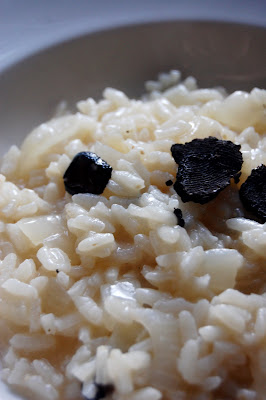
This dish is a bit of a last hurrah, then - it's what I made for tea the night before I left home, two weeks ago, and uses pretty much the most indulgent ingredient I could get my (economic situation-defying) hands on; black truffles. Credit crisis be damned!

...Well, okay, I found these relatively cheaply in Spain. My friends were filling their suitcases with new clothes and bikinis; I was filling mine with an angry coconut in a sombrero and a stash of black truffles. Sometimes I wonder where I went wrong.


Anyway, with less chance to bake, Happy Love Strawberry may change a little in future - I'll probably post more savoury stuff (I do stick the odd thing in every now and then, in a little salute to nutrition) and dinners, and there'll probably be a little less excess (I'll save it for my visits home; you'll know I've been back when I post chocolate chip cookie dough cheesecake squares XD. We can make a happy game of it). But I think you know me too well to believe I can go longer than about four days without a sugar fix ^__^.

Black Truffle Risotto
Adapted from a recipe by Shannon Bennett
Found
here.
Serves 2-3 (it did for three with us)

Chicken mushroom stock (around 5 cups/just over 1l)
Extra virgin olive oil
1 small onion, finely diced
200g risotto rice
100ml dry white wine
30-50g black truffles, shaved
50g Parmesan cheese
50g butter
Salt and freshly ground pepper

1. Heat the stock in a large sauce pan over low heat. Heat olive oil in a heavy-based pan. Add onion and stir until the onion is soft. Add rice and cook until all grains are coated with oil. Deglaze with the white wine and cook until evaporated.

2. Add in ½ cup (about 125ml) of hot stock. Stir until the rice absorbs the stock. Keep doing so until the risotto is cooked to your liking. In the final ladle of stock, add in the truffles (save a few slice for garnish).

3. Remove the rice from heat. Add in the cheese. Season. Serve immediately on warmed plates. Garnish with truffles shavings.


...What d'you reckon? Sugar or Topshop; cake, or shoes?

Sunday 5 October 2008

Sugarcraft Flowers 101: Raindrops On Roses

Part One: Daisies & Primroses is here.

Predictably, I've left it so long between parts One and Two of this tutorial that I've now mostly forgotten everything Alex's Granny told me, but theoretically, here is the second part of my sugarpaste flower guide: Roses and Leaves!

You will need: a small quantity of sugarpaste (I'm reliably informed this is gumpaste in America), icing colours (paste or gel), cornflour for dusting, a few sticks of florists' wire cut into small lengths, a little dish of water, a small rolling pin, cocktail sticks or a little metal rod thing - you can see Alex's Granny's below, but I don't know what it is - and some sort of styrofoam block or similar to stick them in once you've finished. Also, to make leaves, a double-sided veiner; there's one in a picture lower down.

To start with the roses: Alex's Granny keeps a tub of these with her decorating equipment; they're just little lengths of florists' wire with hardened buds of sugarpaste on them. If you're ever using sugarpaste and you've got a bit left over, use the remainder to make some of these and just keep them somewhere separate; they provide the hard base to build your rose around.

To make them you take a little bit of wire - about 6cm? - and hook the end over (below), then you dip that hook in water and just mould a little blob of leftover sugarpaste around it into the little bud shape, pictured.


Here are several hardened bases stuck into the styrofoam block, and you can see I've begun adding petals. For this, you take little blobs of sugarpaste and flatten them out so they're really thin using your mini roller. I always had to do it thinner than I first thought and probably Alex's Granny thought I was slightly retarded, but was too polite and/or British to say anything. Don't be like me.

You can either use a petal cutter now or else hand-shape them into little oval/petal shapes. I can't remember using a cutter for this, but everywhere on the internet seems to assume that you do. Use your thumb and fore-finger to stretch them out so they're really thin at the tips, and to give them a bit of shape. Use the little metal rod thingy or a cocktail stick/the wrong end of a teaspoon would do? to wipe a tiny bit of water around the long edge, and then wrap your first petal around the bud.


The closest to a picture I can get is probably the bud in the top right hand corner of the below picture - it should wrap right around the bud shape at a slight angle to cover the (probably a slightly different colour) base beneath it.

You then repeat this with more petals, but placing the next one - slightly overlapping - at the other side. It should curl around it while it's still so small, as above. And then you just continue to place petals on - use your fingers to pinch the tips together once they're on, so they're shaped more realistically and blossom out a little, and make sure the petals overlap a little bit, but otherwise, you're away!

The above picture I think covers more or less every stage in one swoop XD. I am nothing if not efficient. Don't forget to use water or a dot of egg white to glue, or your rose will start slipping down the wire and go all clumpy at the bottom, and Alex's Granny will wonder what kind of idiot her granddaughter is hanging round with these days.

You can also see if you look carefully that the very edges of some of the outer petals are starting to crack slightly; this is because the sugarpaste is beginning to dry out. It dries insanely fast, especially when it's this thin, so you have to work quickly ^__^. Bear in mind we were doing this over the course of an afternoon.

Voila!


For me?! Oh, you shouldn't have.

For the leaves, you can get any amount of leaf-shaped cutters for whatever you so desire, but we just used a small, simple one - you can see it in the picture below, it's almost petal shaped. Roll your paste out flat, as usual, and cut out a thin leaf shape. You can shape this with your fingers as it is, but Alex's Granny has a double-sided veiner (the weird red thing); if you put your leaf in the centre of that (so it lines up the middle with the centre vein) and press both sides around it, it imprints little leaf veins on both side! Whee, so cute.


You can then just use another little length of florist wire to push into the middle of your leaf - there's a thicker groove along the back - about a third of the way up (you can see below where I've pushed one up too far and it's poking out the back of the leaf a bit). Remember to have dipped the wire in water first, so it sticks. And then just use your fingers to pinch the ends a little and give it a bit of natural shape, so the tip curves a bit.

I've gratuitously sneaked Alex's Granny's hands into the above picture, on the sly. I just can't control myself.

And that's it! Re: other question; these flowers last more or less forever - Alex's Granny showed me these incredibly elaborate displays she'd done for various grandchildren's birthdays and christening cakes -we're talking ten, twenty years for some of these XD. No, I did not try to eat them.

By all means, you can eat twenty year old sugarpaste, but leave me out of it ^__^.

Wednesday 1 October 2008

A Trifling Matter

You may or may not know that it's British Food fortnight at the moment, and considering I'm a fairly patriotic blogger I thought I really had to make time for this one -- I was even organised enough to fit in making this before I left home to start uni at the weekend! Don't all die of shock just yet; I've been so busy that I almost forgot to post it.

The student diet of, er, toast (largely) means I don't feel like I've particularly made the most of BFF, but fortunately the brilliant Antonia of Food, Glorious Food has been flying the (union) flag with her British Food Fortnight Challenge!


I couldn't resist an opportunity to make a 'thoroughly British dish', so to make up for rather scatty posting for a while I decided to go all out with the ingredients for this one - Blackberry Trifle!

If you're unfamiliar with them; trifles generally have four layers; sponge at the bottom, then fruit, then custard, then whipped cream. Usually, at least where I'm from, raspberries are used, but with the theme being British/local/seasonal, I thought I'd branch out a bit.

Yes. I went blackberry picking again.

In my defence, this year was less horrific than the last - there were actually blackberries out this time around, which is always a good start - and it was all going rather well until, at the furthest possible point from home, my bag starting leaking purple juice all down my jeans and I was forced to rustle something up with (un-used! I stress that they were un-used!) dog poo bags. Will the humiliation ever end?

And traumatic experiences aside, I can at least say that I used organic, local, hand-picked blackberries, right?

For the cake part, I thought I probably couldn't get much more traditional and British than by using another of my Gran's old recipes; this madeira cake comes from the handwritten recipe book she gave my mum when she went to uni, back in, I don't know, Tudor times or something. This recipe book is practically an ancient relic, as you can imagine, which is why I don't have it with me at university, and thus why I can't tell you the recipe I used. I know, I'm hopeless.


My failings aside; this is a fabulous trifle - it's one of those puddings I always forget how much I like (until I realise I'm eating serving-spoonfuls straight out of the bowl, headfirst in the fridge). You can also make it ridiculously easily by using bought cake and tinned custard, and to be honest the charm of trifle is partly in doing this (I think it's a British thing. Er, or laziness).

Blackberry Trifle

Measurements for this are all very approximate, because I didn't really use them.

About 400g madeira cake (bought or homemade)
300ml double cream
150g cream cheese

couple of drops vanilla
400g tin custard
400g blackberries
4-5 tbsp water
2 tbsp caster sugar

1. For the base, break up the madeira cake into pieces and push into the bottom of a large serving bowl (I used an old one of my grandma's; bonus British points?). Simmer the blackberries in a pan with the sugar and water for a good few minutes until you have plenty of juice; there should be enough to soak into the sponge to give it that fantastic purple colour.

2. Spoon the blackberries and juice over the sponge and allow this to cool before covering it with the tinned custard.

3. For the topping, you can either just use plain whipped cream or fold in some cream cheese or mascarpone; I saw this in a trifle recipe ages ago but can't remember whose it was. Anyway, your cream should be lightly whipped (don't overwhip it) and dolloped over the custard layer. You might want more than I've suggested; it looks great if you're generous with the cream but proportions are personal preference, and I like less cream and more sponge.

To the Queen!