Showing posts with label this is actually healthy. Show all posts

Saturday, 5 September 2009

tomato & mozzarella tart with basil-garlic crust

tomato mozzarella tart 1

Food blogging is one of those things which starts off fairly rationally ('oh, I'll just take a quick picture and copy/paste this recipe up for future reference') and ends up taking over your life and sanity ('NO ONE IS ALLOWED TO EAT UNTIL I'VE PHOTO'D THIS, AND I DON'T CARE HOW COLD IT IS. AND NO, YOU CAN DAMN WELL HAVE THE CHIPPED PLATE, I NEED THE WHITE ONE. NOW SHUT THE HELL UP WHILE I TRY TO THINK OF SOMETHING WITTY TO SAY'). It's maybe not the best hobby to take up if you want to make friends, although you'd be amazed at what eccentricities people will forgive when a tray of brownies is in it for them.

There are a few things which are incredibly frustrating to a blogger. One is a great recipe which photographs appallingly, especially if it involves seasonal produce. You know you're going to have to make it again, and then you can't get the fruit or whatever it is you need, and it's going to be another year before it's back in season - ugh. (I have a stunning rhubarb & orange cake sitting on my hard-drive - not literally; the crumbs would get on my keyboard - which embodies this very problem)

tomato mozzarella tart 2

The other problem is similar, but less common. When you make something, and you photo it - and then you take it to a party and can't get pictures of the inside (oh cake, how you taunt me) before it's inhaled.

OR, when you make a kickass tomato and mozzarella tart in that tiny interval of time before the summer's tomatoes vanish forever, with a glut of tiny, perfect red-and-orange tomatoes donated by your charming and lovely friend Alex and her greenfingered father (who apparently has had great success with tomatoes and courgettes this season), and it's pretty much the cutest, most photogenic thing you've ever seen in your life. And then you go out for the night, and when you come back the next morning you find that the ENTIRE 10" TART has been ENGULFED by the THREE members of your family, IN ONE NIGHT.

Not that this has ever happened to me -- OH, WAIT.

But when am I ever going to see such adorable tomatoes again; in 2009, at least? I had to post it anyway. Because let's face it, I may not have personal feedback here - but the rate at which this tart vanished is, in itself, a pretty good review.

if the whole world was made of tomatoes it would look a bit like this.

Don't miss me too much: I'm spending the next week in a tent in Scotland (in September. Yes, I know. Wettest holiday ever), so won't be around until next Sunday. Assuming your comments give me the will to survive the drowning hazard this camping trip entails (hinting, much?) I will be back soon with the sugar high you've been waiting for. Three clues for you: Chocolate. Peanut butter. Cake.

Okay, so they weren't so much 'clues' as the recipe title. Don't wait up!

Tomato & Mozzarella Tart with Basil-Garlic Crust
via Ezra Pound Cake
Adapted from Jack Bishop’s “The Complete Italian Vegetarian Cookbook”

I know tomatoes are almost gone, but Alex had so many that I told myself it was okay to post this now - surely she can't be the only one with three giant ice cream tubs full of tomatoes at his time of year? Besides, that should just spur you all to hurry all the more to try this. If you're a Caprese salad fan, this is a much more fun and interesting way to get the same flavours; not to mention that the basil-garlic tart dough is charmingly green-hued before baking. Easily amused, moi?

1 recipe Basil-Garlic Tart Dough (recipe follows)
250g
(8 oz)
sliced mozzarella
500g
(1 pound) ripe tomatoes -
if fullsized, core and cut crosswise into thin slices. I used teeny ones, cut into halves.
Salt and freshly ground pepper
1 tablespoon extra-virgin olive oil

1. Prepare the dough, and press it into a 10-inch tart pan with a removable bottom.

2. Preheat the oven to 190C. Line the bottom of the tart shell with mozzarella. Arrange the tomatoes over the cheese in a ring around the edge of the tart and a second ring in the center. Sprinkle with salt and pepper. Drizzle with olive oil.

3. Bake until the crust is golden brown and the cheese has started to brown in spots, 35 to 40 minutes. Cool on a rack for at least 5 minutes before slicing. (The tart may be covered and kept at room temperature for 6 hours.)

Basil-Garlic Tart Dough
hanful (1/3 cup)
fresh basil leaves
1 medium garlic clove
180g
(1 1/4 cups)
plain flour
1/2 teaspoon kosher salt
115g
(1 stick)
unsalted butter, chilled and cut into 8 to 10 pieces
4-5 tablespoons ice water

1. Place the basil and garlic in the work bowl of a food processor. Process, scraping down the sides of the bowl as needed, until finely chopped. Add flour and salt; pulse to combine.

2. Add butter. Pulse about 10 times, or until the mixture resembles pea-sized crumbs.

3. Add water, 1 tablespoon at a time, pulsing several times after each addition. After 4 tablespoons water have been added, process the dough for several seconds to see if the mixture forms a ball. If not, add remaining water. Process until dough forms into a ball. Remove dough from processor.

4. Flatten the dough into a 5-inch disk. Wrap it in plastic, and refrigerate for at least 1 hour. (The dough can be placed in a zipper-lock plastic bag and refrigerated for several days or frozen for 1 month. If frozen, defrost the dough in the refrigerator.)

5. Roll out the dough on a lightly floured surface into a 12-inch circle. Lay the dough over the tart pan, and press it into the pan. Trim the dough, and proceed with the recipe as directed.

i like the orange ones.

Wednesday, 10 December 2008

Out Of Pocket


It's been a while since I whinged about my love for all things Japanese, and since my sister's been in Japan on a trip for the past week, I thought I was due a good whine. I also thought I was due some Japanese food (it always makes me feel healthy and redeemed, and I like to think it cancels out all the butterscotch pudding).

Inari-zushi is something I'd never tried before - basically it's seasoned rice in tofu pouches, and I'd been dying to give it a go for just about forever, but I had trouble finding the, uh, tofu pouches.

You see, when I made sushi I explained about living in a village overrun solely with alcoholics and the elderly, and inari pouches weren't much of an option (you can neither drink out of them nor... whatever it is that old people do). I'd more or less given up; unless tofu pouches dropped from the heavens and into my unresisting arms, I wasn't going to go too crazy over it. I could've always bought a block of tofu and cut a hole in it, but that wouldn't have been quite the same (not to mention that even tofu is probably a bit ambitious where I come from).

And then I moved a six hour drive away, to a university town where international students are common, and people think the North is some sort of widespread swamp over the entire upper half of England. Finding inari pouches wasn't really my main problem, haha, but all of a sudden I had options I'd never imagined.


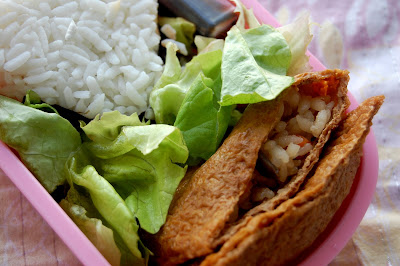
And these are they! Weird crinkly soggy little things, but ohh they were delicious. I know I'd eat more or less anything if you told me they were Japanese, but these honestly took me by surprise - not to mention that I got to model them in my bento box with a rice ball from a batch I'd made and frozen a while back (a very poorly made batch: I don't think I was firm enough with them cause whenever I've had one they've collapsed all over the place).

These look nowhere near as impressive as regular sushi, but I think I enjoyed them even more - and damn, I'm proud of myself. I've come a long way. Literally.


Inari-Zushi
Japanese Cooking At Home - Hideo Dekura
-
Tofu (bean curd) pouches (abura-gea), available from Asian grocery stores. Prepare these by placing them in boiling water for a minute, draining and squeezing out the excess oil.
2 dried shiitake mushrooms, soaked in water and finely chopped - I used regular
1/4 small carrot, peeled & finely chopped
240ml (1 cup) stock
120ml (1/2 c.) soy sauce
2 tbsp mirin
1 tbsp caster sugar

1. Place bean curd pouches, mushrooms and carrot in a saucepan. Add stock, soy sauce, mirin and caster sugar, making sure pouches are submerged while cooking. Bring to the boil and simmer over a low heat for about 10 mins. Remove from heat and allow to stand while liquid is cool.

2. Remove bean curds and squeeze to remove excess water. Transfer to a chopping board and cut in half to make two pouches, then set aside (mine were already in half-pieces).

3. Mix mushrooms and carrot into the sushi rice with a rice paddle. Carefully open the pouches. With wet fingers, make a ball of rice and place it in the pouch. Press sides with fingers to make a pillow shape, and tuck the ends inside. Repeat with the rest.


Wednesday, 22 October 2008

Autumn Days


You know the idea of Autumn? Sitting inside in front of a glowing fire, all snug and warm when it's dark and cold outside; drifts of crisp red and gold leaves which you crunch underfoot and kick into the air; the air getting that little bit sharper and fresher, turning your cheeks pink and making you curl your sleeves around your hands to keep them warm. Pub lunches, with dark wood and bright candles... I love it.

What I hate is Actual Autumn; wearing about twelve layers to pad restlessly about the house in and still being cold, and being bored to death because there's nothing to do inside and you can't go out without getting soaked. Wet feet. Thoroughly depressing grey days.


You wouldn't think a season could change that much from one end of a country to the other (uh, unless you live in, I don't know, Russia. I'm talking an England-sized country, here), but Autumn has been a revelation to me these past few weeks. It turns out watching everything die is a lot more picturesque under bright, clear sunlight; on campus there's a bush such a bright shade of red that it looks like it's burning, and on Saturday my flatmates and I went walking on the common and found a baby Christmas tree growing in a secluded corner.

This is the sort of seasonal comfort food that my brain automatically associates with Autumn-in-inverted-commas, and it's been such a shock to actually have an Autumn (rather than the Northern alternative: 'Death Months') that I thought it was time to dig out the recipe. I made it for the first last year - just before Halloween, actually; I remember because I was hurrying to get tea ready for my dad and sister before I went out to a party. If it amuses you, imagine me cooking this dressed as Anne Boleyn. It adds a certain je ne sais quoi, I think.

Anyway, it's totally comforting, ridiculously easy (if you have a food processor. You know, the sort I Don't Have At Uni with me. I used a masher and tore up the breadcrumbs by hand) and extremely cheap, which gives me a good feeling about my ability to look after myself in the big wide world. Oh, and healthy, don't forget that. Don't let those Death Months strike you down, as we say up North.

...We don't actually say that. I might just tell people that we do.

Carrot & Parsnip Crumble
Recipe from Josceline Dimbleby's Complete Cookbook
Serves 4.

100g brown bread (leave crusts on)
675g carrots
450g parsnips
4 tbsp fromage frais or similar
(this time I used yoghurt; I've used creme fraiche before)
1/4-1/2 tsp nutmeg
75g grated cheddar cheese
25g parmesan
(I skipped this and use 100g cheddar)
2 tsp dried oregano
3 tbsp olive oil
salt & pepper

1. Whizz (or tear) the bread to crumbs in a food processor, then set aside in a bowl. Peel and chop carrots and parsnips roughly, then boil them til very soft. Drain and put in the food processor (may need two batches) with the fromage frais, and whizz to a smooth paste.

2. Grate in the nutmeg & add salt and pepper to taste. Turn the mixture into a shallow ovenproof dish and spread level.

3.Stir grated cheese, oregano and olive oil into the breadcrumbs and spread that evenly over the top of the pureed veg. Cook for 15-25 mins at 230C, til the topping is crisp and golden.